<< Latest

Saturday, July 31, 2004

The F Number - Demystified

In any camera that allows you to have control over aperture, the aperture setting is done using what is referred to as F stops. For example, in my Canon G5, the F stops are as follows.

2.0, 2.2, 2.5, 2.8, 3.2, 3.5, 4.0, 4.5, 5.0, 5.6, 6.3, 7.1, 8.0

What this means is, I can set the Aperture on my Canon G5 to any of these values. So what does it mean to set the aperture to F2.0 or F4.5 etc ? Every newbie, faces some confusions with these F numbers.


  • They don't seem to follow a linear series like 1, 2, 3, 4
  • Notation keeps varying like f/2.0 or F2.0.
  • The number is supposed to indicate a value of Aperture but there is no "A" in the notation!
  • Any time there is a discussion about increasing or decreasing aperture, people don't use these numbers. They talk about "stops", like move up 1 stop or move down half a stop etc.

So what's up with this numbers ? The concept behind these number is not that complicated, but the notations and varying terminology to describe the same thing leaves some room to explain.

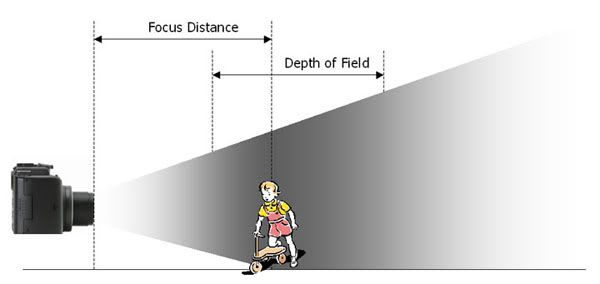
Aperture is the size of the opening that lets light in to be exposed on your CCD or film. To control the amount of light that is exposed, you vary the size of the Aperture, i.e. the area of the opening. To reduce the amount of light entering by half, the aperture area can be reduced to half. When the aperture is reduced to half the size, than that is called one full stop reduction of aperture area. Similarly when the aperture i.e. the area of the opening is doubled, that is called one full stop increment of aperture area. Let's say the maximum opening of aperture is the zero stop and we keep reducing the aperture from there, each time reducing the area by half i.e. by one full stop. In the figure below, the circles on the left show what the area would look like from zero stop to 5 stops. On the right is a graph, showing how diameter changes as we reduce area by half with each stop.


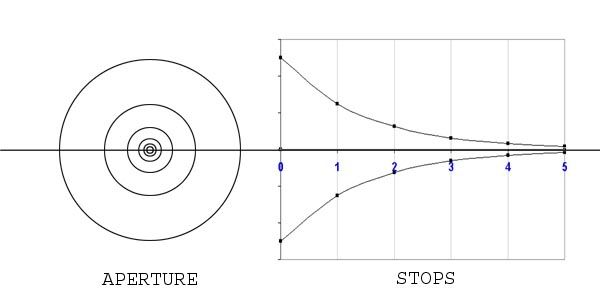
If you are technical or if you remember your geometry class, you can figure out that, to reduce the area to half (divide by 2), the diameter of the circle must be divided by square-root of 2 = 1.41421356.


Now in any cameras, if we had to deal with measurements of the diameter to control the aperture, it would be impractical to operate. So instead of actual dimension, the diameter is noted as a fraction of focal length f of the lens of the camera. So let's say maximum diameter of aperture is equal to half of the focal length, then this diameter is noted as f/2.0.


Next, let's say we want to move to next stop, then
the diameter of aperture at next stop = f/2.0 *1/1.41421356 = f/2.82842.
Similarly as we continue to next stops, we see the diameter as indicated by following series.


stop 0 = f/2.00000
stop 1 = f/2.82842
stop 2 = f/4.00000
stop 3 = f/5.65685
stop 4 = f/8.00000
stop 5 = f/11.31370
stop 6 = f/16.00000
stop 7 = f/22.62741
stop 8 = f/32.00000


The F number that you see on your dial or on your LCD when you play around with Aperture is this divider. However, in any camera, having aperture values at full stop intervals only is not enough. One would definitely want to have finer level of control over aperture than just double the light coming in or reduce it by half. That's why most of the cameras provide aperture values at half stops or 1/3 stops. You can imagine intermediate values of diameter at 1/2 or 1/3 positions between various full stop positions on the STOPS graph above.

In case of half stops, between each consecutive full stop aperture values, there will be one more value which is derived by dividing the bigger diameter by fourth root of 2 = 1.1892071 . Another thing worth note over here is that each move to next F number reduces the amount of light to about 71% (70.71% to be precise) of previous setting. So moving twise reduces the light to 0.7071*0.7071 =0.5 = 50% = full stop as desired.

We are more interested in one third stops because that is what G5 has.

In case of one third stop intermediate aperture values, each time next diameter is derived by dividing previous diameter by sixth root of 2 = 1.1224620


With that formula, the series you'll get is...


f/2.00000 = stop 0
f/2.24492 = stop 0 + 1/3
f/2.51984 = stop 0 + 2/3
f/2.82842 = stop 1
f/3.17480 = stop 1 + 1/3
f/3.56359 = stop 1 + 2/3
f/4.00000 = stop 2
f/4.48984 = stop 2 + 1/3
f/5.03968 = stop 2 + 2/3
f/5.65685 = stop 3
f/6.34960 = stop 3 + 1/3
f/7.12718 = stop 3 + 2/3
f/8.00000 = stop 4


As you can see below, this is what canon G5 offers.


2.0, 2.2, 2.5, 2.8, 3.2, 3.5, 4.0, 4.5, 5.0, 5.6, 6.3, 7.1, 8.0


In this case, each time you move to next F number in aperture setting, the amount of light reduces to approximately 80% (79.37% to be precise) of the previous setting. This way after three moves, the amount of light reduces to 0.7937 * 0.7937 * 0.7937 = 0.5 = 50% or full stop as desired.


Things to remember about Aperture setting and F number


  • F number is an indicator of aperture of camera, it denotes the diameter of the aperture as a fraction of the focal length of the lens.
  • F2.0 or f/2.0 means the same thing, they are just different notations.
  • Smaller F number means larger aperture = more light.
  • Larger F number = smaller aperture = less light.
  • Moving one full stop to a higher F number reduces the light to half and moving one full F stop to lower number means doubling the amount of light.
  • If your camera provides 1/3 stops, then to move a full stop will require moving to the third number in the series. Similarly, if your camera provides 1/2 stops you will have to move two numbers in the series, to move a full stop.
    For example, in G5 a move from F2.0 to F2.8 is a full stop and reduce the light by half. But a move from F2.2 to F3.2 or F2.5 to F3.5 is also a full stop and reduces the light by half.
  • 1/2 stop movement reduces the light to 71%
  • 1/3 stop movement reduces the light to 80%

Labels: ,

<< Latest

"Hope and Confidence"

Here are a couple of shots of a monument named "Hope and Conidence" in front of the hospital I visited this week.


Here is a different crop of the same subject.


Labels:

<< Latest

Wednesday, July 21, 2004

Car Show !

Today evening, I came across a local Car show just by chance. Lucky I had G5 with me. So I tried some photography in low light of the evening.


F2.0, 1/15 sec, ISO 50


The first one came out nice. I did not have a tripod with me. In aperture priority, I opened full aperture F2.0 for maximum light. I did not move ISO from 50. And just tried this shot 1/15 sec to see if I could handle it. Lucky, it came out nice.

I did not want to take chances again so settled the camera on a Fire Plug and shot this second one.


F2.8, 1/8 sec, ISO 50


The fire plug was a bit far, so I had to zoom in. But zoom reduces the limit on Maximum Aperture, so now I was limited at F2.8 instead of F2.0. To compensate for that I could have upped the ISO, but that invites the noise. Instead, with the stability of fire post, longer shutter time was not an issue, so I kept it in Aperture priority and shot is at 1/8 sec. Not bad ! :-)

For the rest of the pictures, I had no choice but to increase the ISO because people were all over and I could not waste time looking for a support or waiting for it to get clear. The Higher ISO brought in a lot of noise. I got rid of a lot of noise using free version of Neat Image. I have not dug deeper into its features but it works like a charm on the higher ISO noise. I still prefer to avoid the noise in the exposure.

Even at ISO 400 and F2.0, the shutter speed was slow at 1/30 or 1/40. This limited the number of pictures that came out unshaken :-( Even some of these you see below were shaken but don't look that blurred here due to loss of resolution.

Check "Lessons Learned" at the bottom.


F2.2, 1/40 sec, ISO 400


F2.0, 1/30 sec, ISO 400


F3.0, 1/30 sec, ISO 400


F2.0, 1/40 sec, ISO 400


F4.0 , 1/6 sec, ISO 200


Lessons Learned
  • Once again, I wish I had a tripod or monopod with me. It wouldn't hurt to keep an extra cheap tripod in the trunk of the car (I'm still amateur you see...)
  • In some of the shots I tried to stabilize the camera by pulling the camera away from me with the strap tightened around my neck. This did help in some cases but not always.
  • Couple of times I tried to stabilize the camera by pulling the camera away from me but towards the ground to get an angle closer to horizontal. This required the LCD to be flipped on the side and face upwards toward me. It was so inconvenient with the strap coming in the way, reminding me once again how much I dislike sideway flipout of G5. (See "What I like/don't like about Canon G5")

Labels:

<< Latest

Sunday, July 18, 2004

Depth of Field - the Third Dimension

If you have done only Point and shoot photography so far, then most probably you are not familiar with the term Depth of Field.  Why ? I guess for the same reason why you may not know much about Tax laws - you didn't have any control over it! :-)

Take a look at the picture below.


Everything from the face of the angel figure to the basket-ball net is captured with good to reasonable sharpness. This is because, everything in the frame is within a range of distance where camera can capture it with sharpness acceptable to human eye. The actual point of the focus of the camera is somewhere in-between this range. This range is called the "Depth of Field".
 
Depth of Field is a the range of distance from camera defined such that all the objects at a distance from camera within this range are captured with acceptable sharpness. Objects outside this zone appear blurred.
 
What is acceptable sharpness may depend on what is the desired magnification of the final media where the image will be reproduced. But there are no standard boundaries demarking the depth of field.
 
The reason why we see most of the things clearly captured in point and shoot camera is because their depth of field is very large - typically starting from 5ft and upto infinite distance. Moreover, this depth of field is fixed for point and shoot camera. 

A Prosumer camera is different. It gives you power of changing the Depth of Field, you can move it closer or farther and you can also change its thickness. First let's take a look at the effect of manipulating the Depth of Field. 


F8.0 , 1/13 sec

In the first picture, the angel is sharp, the background is out of focus yet objects are recognizable.  Now compare it with the picture below.


F2.8 , 1/100 sec (rollover the image to see the difference)

In the second picture, the angel looks almost same but the background is completely blurred! In fact it makes the angel stand out a lot more than the picture before. Everything else is pretty much same.
 
In both the pictures, the point of focus is anchored at the same place - the angel - the subject, where it should be. What is different is the depth of field (DOF).


With proper framing you are deciding what you want to capture in terms of width and height of the field in front of you. But with Depth of Field you are deciding the range of distance from the camera that you want to capture clearly. In that sense, it's the Third Dimension of your Frame. Anything that is acceptably sharp is "in-frame" and anything that is blurred is "out-of-frame" in the sense of Third Dimension of Frame.
 
You play with this third dimension with two parameters to get the desired result. Aperture and Focus 
  
Focus: The focus distance or point of focus is sort of an Anchor Point for the Depth of Field. Everything at this distance appears with crisp sharpness. Your Subject should be at this distance. Other objects closer than this point or farther than this point will appear with varying degree of sharpness depending on your chosen DOF. What are the boundary points of the depth of field is a highly debated topic because there are no hard boundaries. It all depends on what is acceptable in the final media. 
 
Aperture: Once you have anchored the focus, you can manipulate the depth of field by changing the Aperture Value - the size of opening that lets in the light on your CCD. The Aperture is measured in F numbers. The main difference between the two pictures above is the Aperture. The first one is captured with an Aperture measured as F8.0 (smallest opening in G5) while the second is with F2.8 (largest opening allowed with full zoom in G5). It sounds a bit confusing that larger number represents smaller aperture, but more on that later. 
  • If you choose a large Aperture (small F number), depth of Field will be very narrow. This causes most of the objects in front of the focus point and behind the focus point to be blurred out. This is very suitable for Portrait Photography, as it makes the subject stand out very well. In the drawing below, a darkness of shade represents sharpness at that distance. Darker the shade, more sharp the object will be at that distance.

Narrow depth of field 

Another example of very narrow Depth of Field is the macro shots of a wine glass I posted earlier. You can see that even the front part of the base of the glass is blurred out as it is too close.

  • If you choose a small Aperture (large F number), depth of Field will be very wide. This is suitable for landscape photography on your site seeing vacation. Everything from the nearest tree to the farthest mountain will be sharp.

Wide depth of field

Below is another example of wide depth of field. As you can see everything from nearest flower to the farthest mountain is captured with acceptable sharpness.


F8.0, 1/200 sec

  • The easiest way to play with depth of field is to use your camera in Aperture Priority Mode. In this mode, as you modify the Aperture value, the camera will take care changing the shutter speed in such a way that your CCD gets right amount of exposure (Read Earlier Post : Cooking and Photography. Also, note the shutter speed in the examples in this post)

The side effects: So what else you have to do to make sure you don't mess up anything else in your picture?

  • If you are using large depth of field = low aperture = small opening = large F number, make sure that your picture gets enough light for proper exposure. If u are using Aperture Priority Mode, Camera take care of this. If you are using manual mode, you will have to decrease shutter speed or increase ISO sensitivity.
  • Similarly if you are using a narrow depth of field = large aperture = large opening = small F number, you have to worry about overexposure. In Manual Mode, increase Shutter Speed, or decrease ISO Sensitivity. Sometimes this may not be enough, e.g. If you are trying to take a picture of a white flower in bright sunlight with very narrow depth of Field. In that case, you will have to use an external Neutral Density Filter, to reduce the intensity of the light. I use G5's built-in ND filer feature.
  • If camera selected the shutter speed for you, you still need to take a note of it and decide if you will be able to hold the camera still for that long. Anything below 1/60 or 1/80 seconds should be shot with a tripod or other support.

So far, I have only played with the extremes of depth of field for portrait and landscape photography. However, in Macro photography, a proper selection of depth of field becomes more important as the distance differences between various objects are very small and with macro lenses and filters, the depth of field becomes very narrow.

Labels: ,

<< Latest

Saturday, July 17, 2004

A couple of Macro Shots

I took this macro shots recently at a restaurant. Canon G5 has a macro mode that allows you to focus on objects as close as 2.0 inch. When in macro mode, autofocus looks for the nearest object to focus.  Click on the image to see it in higher resolution.


I wish I had moved that menu out of the frame before taking the photo.

Labels: ,

<< Latest

Thursday, July 15, 2004

The Rule of Thirds

In Photography, there is this very famous rule that is preached a lot to the beginners. It's called "The Rule of Thirds".
 
Hmm... What it is this rule about?  Well, in California, The Rule of Thirds means

"Whatever Money you make every month, is divided into Three pieces
  • First piece is taken away by the Government
  • Second piece is taken away by your landlord or the mortgage company
  • And the remaining piece, is shared by you, your spouse and kids."

Just Kidding, :-)

Rule of third is actually about how to position your subject in the picture. Actually it's not even a rule, it's rather a guideline for making reasonably framed pictures.

As there is no "Official Text", here is my version.

"Whenever appropriate, place your subject at one third distance from the edges of your frame."

Take a look at the picture below.


In this picture, the subject - the bikes - is placed in the middle of the frame, little bit off the center. The picture looks OK. Now compare this with the picture below.


The bikes are placed in one corner, centered approximately at one third height from bottom and one third width from right. The picture looks framed better then the first one.
 
Here is another example.


Below is the same scene, framed again with The Rule of Thirds in consideration.


Main contrast between the two pictures is the fact that, the first picture puts all the emphasis on the surfer by putting him in the middle, while the second picture puts almost equal emphasis on the surfer as well as his surrounding. It also puts emphasis on the direction of his movement and makes it look like the surfer has just entered the frame from the left side.

Another thing worth note here is that the frame is divided horizontally in almost equal parts by water, land and the background of mountains, making it very symmetric.

It does not make sense to try to use The Rule of Thirds for every picture. However, so far I have found that, in any frame where in addition to the subject, you also want to capture an essential property of the surrounding, the rule of third can be used very naturally to create a balance between the subject and the surrounding. For example, the example above shows the beauty of the lake side as well as includes the surfer in harmony with it.
 
Here are a few more examples. 


At the Pier, San Francisco, California


All Terrain Vehicle, Rural India


Waiting for the Spring, Mountain View, California

Labels: , , ,

<< Latest

Tuesday, July 13, 2004

LCD - Looks Can-be Deceiving

A great many amature digital photgraphers have been disappointed many times by the little screen on their digital camera called the LCD - Liquid Crystal Display. The inclusion of LCD brings a very important advantage of SLR - Single Lens Reflex Cemara to your Digital Camera. What you see in the LCD is exactly what will be exposed on the CCD. Just like in an SLR where what you see in view finder is what is exposed on the film through main lens. This is very important for accuracy of framing. It is different from a point and shoot film camera where what you see in viewfinder is from a separate lens. However, LCD has a big drawback. It's resolution.

Take a look at this shot I snapped in rural India. This is an approximation of what the Image would look like on the LCD Screen of Canon G5.


At first sight it looks fine and sharp. Now click on the image to open the full size picture. Surprize ! It is all blurred ! So what happend ?

Well, I was in aperture priority mode, I didn't want to use flash or higher sensitivity (higher ISO), there was not enough light, so camera suggested a shutter speed slower then 1/60, I did not use the tripod, and my hand shook while taking the picture. And that's not the worst thing. The worst matter is I did not realize this mistake until I got the picture downloaded on the PC. Deceived by LCD, You go home feeling great about your pics and when you open'em up they look blurred.

The LCD window has limited resolution and there is no easy way you can tell if the picture is shaken. On the other hand, a high resolution image will have captured even your slightest shake in high resolution!

Another problem that cannot be detected easily on LCD is those Out-oF-Focus pictures. OFFs happen especially in follwoing cases

  • Low Light : You used autofocus in low light.
  • Far Focused : Someone took a picture of yourself and a friend at a close distance but the focus was on something else at further distnace visible between the heads of you two.
  • Near Focused : You took a picture of objects behind a fence or a glass window. But you got the glass window or the fence in clear focus and everything else blurred.

All of these problems can be avoided by using Manual Focus mode (MF button in G5) Although MF allows you to select the focus distance, you still use the LCD for making sure that the subject is in proper focus. In G5, part of the LCD screen shows a magnified view to help with Manual focus.

Another way to avoid OFFs is use lower aperture (higher F value). This increases the depth of field - the range of distance from camera in which everything is captured in focus.

Lessons Learned - How to avoid taking blurry pictures with your Digital Camera ?
  • Don't trust your hands : You are human, not a robot. If you are going to take pictures at speed slower than 1/60, please make sure your camera is stable. Use a support level. Tripod is the best defence.
  • Don't trust the AutoFocus : Watch out for a fense or other near by objects that may grab the attention of AutoFocus. Make sure that your subject is focused properly. Use Manual Focus when in doubt.
  • Don't trust the LCD : That's right Looks Can-be Deceiving. Preview your image and Zoom in on the LCD if you can detect any shake or focus problem.
  • Take a second pic : Snap it again when in doubt. Be more careful in the next shot.
  • Use Focus Bracketing : If it is really tough to tell if you have got the subject in focus or not, then the best way to go is to use the Focus Bracketing mode of your camera if it provides one. In this mode, the camera takes more than one pictures with focus set at varying distance. G5 takes 3 pictures, one at selected focus point, one focused at a shorter distance and one focused little further. Chances are that you will get at least one of them right. This mode can't help you with Camera Shake though.
  • Find the right balance : You can increase the depth of field by reducing the Aperture, but that let's in low light, so you have to go for slow shutter speed for letting enough light in. But then you run into the risk of shaking it. Alternatively u can increase the ISO speed to capture more light in short time, but in digital cameras this lead to higher noise (grainy images). Obviously Noise is something that you don't want, but you may have no choise if you are taking pictures of fast moving objects in low light ... kids running around after dinner for example. Point is, for every shot in low light, you have to decide where u want to compromize and achive the right balance of Aperture/ShutterSpeed/ISO such that you capture what is the priority in the picture : Time, Depth of Field or crisp clear no-noise quality.

I'm waiting for anti-shake technology in consumer cameras like what Sony has in their camcorders. That'd definitely save a lot of disappointments.

Labels: ,

<< Latest

Saturday, July 10, 2004

"It definitely looked much better than this picture!"

If you are in the process of learning photography like me, it is quite possible that in past, you have taken pictures of excellent locations and settings, but once in print or on screen, the scene does not look that gorgeous or amazing! So what goes wrong in-between? In my opinion most of the time it is simply poor composition.

Take a look at this picture of the buildings near Crooked Street, San Francisco.


  • Subject of the picture - the buildings on crooked street - stands out. The sibject immediately grabs the viewer's attention.
  • The picture is very symmetric. View is nicely divided between ground, building and the sky.
  • All the emphasis is on the buildings. The angle of the camera and the inclusion of the slope of the street emphasizes the height of the building and its unusual location. There are no other distractions.

Obviously, this is one of my favorite shots! A very big part of why this picture looks good is because the way it has been framed.

But I have not been this lucky always. Take a look at this shot taken just a few feet away pointing towards the Alcatraz.


This picture was taken standing in the middle of the road and obviously there was a sense of urgency while taking the picture. I was trying to capture the Cable Car in the background of the sky in this shot. But I ended up getting a lot of other distracting items around it.

Well, not to worry as I have taken the picture in "Large" + "SuperFine" format :-). I can just get rid of whatever I don't like by cropping, without making big compromises in size and quality of the picture. And that's what I did.


Now
  • The Cable Car stands out.
  • The picture is symmetric.
  • Only distraction now is the Alcatraz, but I guess there is no way around it now.

Hmm... I'm so glad I got a 5MP camera and not a 3MP as I had planned at first !

Capturing this world in the bounds of a frame does need some special care. From what I have learned so far, it's just a matter of practice, patience, attention to details and little bit of cropping :-). So take your time and frame your picture properly. And if you are not sure, just zoom out and take a large fine quality picture, you can alway crop it later.

Labels: , ,

<< Latest

Wednesday, July 07, 2004

July 4th Fireworks

This July 4th, I tried some Digital Photography of Fireworks using my Canon G5 for the first time. It was definitely very good opportunity to learn how to take pictures of fireworks. First, here are some of my favorite shots.


Flowers on the Fence
F8.0, 8.0 sec, ISO 50


The Blue Eye
F8.0, 4.0 sec, ISO 50


Red, White and Blue
F8.0, 3.2 sec, ISO 50


Honeybees
F8.0, 15.0 sec, ISO 50


Lilies
F8.0, 15.0 sec, ISO 50


Rose Bouquet
F8.0, 15.0 sec, ISO 50


Diamonds and Roses
F8.0, 15.0 sec, ISO 50


Trees on The Beach
F8.0, 4.0 sec, ISO 50


It was overall a very satisfactory experience. Myself and a couple of other friends were all set with our cameras and tripods 1/2 an hour before the show started. The show lasted for about 40 minutes. We played around with various shutter speeds and apertures to get the best shot without letting it to shine too much. I took total 68 pictures and the 8 pasted above are the best of the bunch. They've beat all my expectations. So what did we learn ?... Here we go .

Lessons Learned - tips on how to take photographs of fireworks

  • Location, Location, Location. The location we had chosen was about a mile and half from the fireworks site. The level was excellent, with minimal obstacles in between. And the best part was, Wind was at an angle going in opposite direction. If the smoke is flowing in your direction, your pics would look like "smokeworks". Also, we hardly had to change the angle of the tripod once set. Another important thing to remember is that, make sure there are minimum other light sources in your field of view (unless it's a spectacular city skyline that would look gorgeous in the background of your fireworks !! )

  • Tripod is a MUST. With long exposures (2 to 15 sec!) to capture the spectacle, Tripod is a MUST. Most of us cannot hold the camera steady for more then 1/60 second.

  • Go all Manual. That's right. The best way to learn is try it out. Automated modes don't teach you anything. Here are the things I set up manually.
  • Focus: Manual Focus set to infinite.
  • Control Mode: Set to Manual "M" (on my Canon G5). This allows full control over Aperture and Shutter Speed. In other words, you control how much light will be applied and for how long. Camera's Metering is completely ignored.
  • Aperture: Set to minimum. i.e. Maximum F number, in Canon G5 F8.0
  • Shutter Speed: I tried various speeds between 2 seconds and 15 seconds. Longer exposures yield very interesting results as you can already see above.
  • I even turned on ND Filter, a built in feature in Canon G5 that create a Filter effect that you'd typically use to decrease depth of field by widening aperture in bright sunny days without letting too much of light in. I just tried it because, I wanted to expose even less light, in order to make the pictures look finer, capture the colors better. But it helped in other unexpected way, it filtered out a lot of smoke!

  • Composing the Picture I'd say don't worry too much about this. Take it for granted that you are going to have to crop the image once you download it. You can't predict where a shell is going to explode. Also if you zoom in too much, you may loose part of the explosion. Best is, zoom out to reasonable field, use maximum file size and resolution, do your framing offline by cropping. You'll have this luxury only if you have large flash memories and you are at a reasonable distance from the site.
  • Releasing the Shutter You want to release the shutter without shaking the camera. Best way is to use the remote. That's what I did. But I missed couple of good opportunities while trying to point the remote correctly. So after that I started releasing the shutter by hand. This still didn't cause any problem, because the camera was firmly set in the tripod. Another reason why tripod is a must.
  • Timing the Release. Lot of the otherwise excellent shots were ruined by falling debris. Although, this can create interesting effects, best pics have minimal of such debris. That's why the best time to release the shutter is right after the sky is clear and you see new shells shooting upwards. Oh and important thing, keep your finger on the release button, but your eyes on the show, not LCD . As you won't be worrying about framing, no need to look at the LCD anyway.
  • "Do you have a flashlight ?" You will be asking someone else if you don't have one. And chances are that you will definitely need one if you have selected a good - dark - location, to set or check some controls of your camera. Keep a small and handy penlight with you.
  • Try different shutter speeds Don't stick to a 2 or 3 second exposure, try various exposures of different lengths, you are not going to overexpose the picture anyway if u have selected a dark location, a small aperture and multiple explosions don't happen at the same spot. In Canon G5, once you select Manual mode "M", you can set both shutter and aperture with a single jog dial button!
  • Don't try to get the "Finale" in a single long exposure It definitely will look like overexposed mess... Not pretty ! Instead, I could have taken it in multiple 1 second or smaller exposures.
  • Take as many shots as you can Keep a lot of flash memory loaded and take a lot of pictures, you will find some very interesting shots in it.

I guess this is it. Hopefully New Year Eve fireworks session will be even better !

UPDATE : 8/6/2004 7:00 PM

Updated Exposure information in the images posted. Also below is a size adjusted version of "Flowers on the Fence" to give a persepctive of distance. Thanks for the suggestion "J".


-Saanga

Labels: ,

<< Latest

Tuesday, July 06, 2004

Cooking and Photography

What does cooking have to do with Photography? At first thought you'd think there is not much. How about explaining the most important concept of photography using an analogy with cooking!

In any hot dish, you put the pan on the stove or in the oven, set the temperatue and heat it for some period. At the end of it, you may get the food that is cooked right and ready to eat. Or ... if you are not so good in your judgement or not that experienced, you will end up with food that is half cooked and raw or overcooked and burned.

The most important concept in photography is getting the right exposure in your picture. Exposure is basically the amount of light that you are allowing to reach your film. Getting the exposure right is very much like cooking. You allow too much of light and most of the picture will be overexposed just like food will be burned with too much of heat. On the other hand if you don't allow enough light, your picture will be underexposed just like not applying enough heat to your dish will leave it half cooked.

Now I am not a cook, but I can tell you there are so many ways to burn your food :-)
  • Set the temperature to higher then necessary
  • Leave the pan on the stove for long time
  • It also depends on what is that you are cooking, rice will burn faster then a lot of other foods
Any of these setting would result in more total heat applied to the food then necessary.

In Photography, there are analogous settings that if not set right, would result in an over exposed image.
  1. Aperture : The size of the hole that opens up in your camera's main lens, that will allow the light to be exposed on the film. Just like the temperature knob on the stove would allow more or less heat, the aperture setting would let more or less light come in. If you leave it fully open you may over expose your film.
  2. Shutter Speed : The amount of time you leave the shutter open to let the light be exposed on your film. If you leave the shutter open for time longer then necessary, it will overexpose your film, just like leaving the food on stove for long will burn it.
  3. Film Speed : The sensitivity of the film that you are using. More sensitive film capture more light in less time compared to a less sensitive film. This is similar to using a very thin Pan that passes most of the heat to the food. It may burn your food if you are not careful.
The same things are applicable in a digital camera, except that the light will be exposed on a CCD (an electronic component that mimics the film).

Check this picture, a birthday cake, overexposed.


Now oevrexposure in the above picture may not look that obvious to newbies. But when you see the same picture in negative, you will see a burned cake ;-) !


If I can use "burned" to mean "overexposed", in the above picture, you can see that major part of top of the cake looks completely burned, you can not see any details of the surface. The sides of the cake although do show detailed texture as it is properly exposed.

[ When u look at the image in negative, it becomes so intuitive to think of overexposing an image as burning it, isn't it ? :-) ]

So start thining like a cook. Be careful not to burn your pictures! And with a good Digital Camera, you have plenty of help at hand. Let's see what I mean by that.

Cooking with a "Smart Stove"
That's right, a digital camera is like a "Smart Stove"! Imagine a stove that would not let you burn your food! Once you place your pn on the stove, it somehow figures out how much of total heat will be needed to cook it. Then it let's you select one of the two items, temperature or time.
  • You want your food to be ready in 5 minutes, and stove will automatically set the temperature for you.
  • You just turn the knob to some temperature and the stove will automatically turn off once the food is ready.
In either case, you decide one value and the stove decides the other. Now instead of rice if you put spaghetty, it may decide for a different total heat and accordingly decide different time or temperature for you. But basic idea remains the same.
So how does digital camera help in "cooking pictures without burning" ? Here is how ...

Metering
Metering is the technique used by your camera to come up with the right amount of light to allow. The camera analyzes the content of the scene (various colors and their brightness etc) and then comes up with an Exposure Value - a value that indicates total amount of light that is required for proper exposure.

Aperture Priority Mode
In this mode you select the aperture and the camera selects the shutter speed such that total light allowed is equal to the exposure value. Typically this mode is indicated in your camera's settings with a "Av" for "Aperture Value".

Shutter Priority Mode
In this mode you select the shutter speed and the camera selects the aperture such that total light allowed is equal to the exposure value. Typically this mode is indicated in your camera's settings with a "Tv" for "Time Value".

Below is a picture of the Canon G5's Control dial, showing "Av" and "Tv" modes.


Hmm... I'm wondering if there were really a product like "Smart Stove!", it'd definately save a lot of meals from buring.

Labels: ,

<< Latest

Monday, July 05, 2004

Colors with G5

Here are some of my favorite colorful shots with G5. Click on the Image to see full size.


Shopping for Sarees in India


Colorful Clothes hanging in Patio


"Laughing Buddha" Figure on our Dining-Table


Labels:

<< Latest

What I like / don't like about Canon G5

OK, so after a long justification for why I bought Canon G5 in the previous post, I feel I should review how that decision turned out.

What I like about Canon G5

  • Battery Life : I have been very happy so far. I have been able to take so many pictures in parties and site seeing without worrying about the battery. I don't even have a backup battery. But I have been lucky so far. One thing I'd caution though, If you run into the low battery signal, you will not have long time after that. So turn off the LCD and start using that viewfinder after that.

  • Color and Detail Reproduction : I still feel this is the strongest positive of Canon. No Complaints.

  • Great LCD : I had not paid much attention to this when I purchased but looks like this one has one of the finest LCDs. I keep hearing "your LCD is much better then mine" :-) !

  • 5MP : I've many times heard "You don't need 5MP, 3MP is enough!" Well, I think that is right unless you want to be serious about photography. With Large Image Size and Super fine quality, you can get a lot out of a poorly framed picture by cropping out all the less interesting stuff. You will be amazed at how much difference proper framing can make. But you can't do framing by cropping if your picture itself is small. Can you :-) ?


Now, here are few things that I have learned to dislike after using this camera for the last few months and I think these things will play a good role in how I evaluate a camera for purchase next time.

What I don't like about Canon G5

  • Sideways LCD Flip-out with Strap next to it : This is my Number 1 Complaint. The sideways LCD flip-out can get tangled with the strap. Yes, you can turn the LCD 180 degrees and put it back in the camera body, facing the LCD your side and the strap won't be a problem. Still I think a vertical flip like Olympus C5060 is a much better design.

  • Function settings are different for each mode : Function settings, i.e. the things that you set using the FUNC button, like Image Size, Image Quality, Effects, ISO Speed etc. are stored separately for each mode. Why is this a problem ? Let's say you are taking pictures in Aperture Priority Mode and you set the size to Large "L" and quality to Super Fine "S". Then if you decide to take a picture in Shutter priority, Your Image settings have to be set again to L and S. Otherwise you will end up taking pictures with size and quality you had used in Shutter Priority mode last time. There is no "Global Setting".

  • Slow Autofocus in low light : I did not have this complaint until I saw a friend's olympus. In low light, the lens motor keeps moving looking for proper focus and it can easily take 2 to 5 seconds to set the autofocus. I wish it were faster like the Olympus.


Labels:

<< Latest

Sunday, July 04, 2004

Why I chose Canon Powershot G5

Buying a Digital Camera can be quite overwhelming, there are so many good brands, models and so many features to evaluate. I bought my first digital Camera in November 2003 before I leave for a long trip in December. After a lot of research and reviews I zeroed in on Canon G5. And I have no regrets.

Here is why I chose Canon Powershot G5.

I wanted to stick to $300, 3 MP, compact body. The Choices were,

  1. Canon A70
  2. Nikon Coolpix 3100
  3. Sony DCP72/92


I chose canon for the colors. On reading reviews and images, I liked canon's color reproduction better. Then A Friend introduced me to E18 problem in Canon. (Many of Canon A70 models were having this problem, where the LCD will simply display "E18" error code in red and the camera will not work.)

I was almost going to get it anyways but searched one more time for existing users experience (not reviews on Amazon) in user forums... Found detailed threads on E18 :-( So dropped the plan for canon A70 entirely and started considering Nikon/Sony. Could not decide for a while, so had think what I really really want.

The reason for staying at $300 was not necessarily because I think spending more money in camera was waste, but because I didn't want to spend more until I get something that gives me more control like an SLR (which are expensive right now). I've always been interested in photography for more then point and shoot, bought an SLR too, but found it hard to learn, was not willing to waste/justify a lot of "trial and experiment" film. So I was thinking lets get whatever I can for now and when prices go down I'll go higher model.

Another important thing to me was color reproduction. This is very subjective and may differ person to person like taste of tongue. I liked canon. Knowing that made it very difficult to switch brand. I
think their DiG!c processor really makes difference. So I decided I just want to go for Canon, if not A70, I'll higher my budget and see what else is next.

Next was Canon S45 (4MP)
and then was Canon S50 (5MP)

Although these cameras are good, they are kind of in the middle. They are compact like point and shoot but not as feature rich as SLR.

So I ended up looking one more step up to see what additional feature are available at higher levels, which brings me to G series.

There was Powershot G3 (4MP, discontinued now but widely installed user base) and Powershot G5 (5MP introduced in summer 2003).

What I realized I was looking at a point and shoot like camera with SLR type capabilities. So I had to reconsider, why I wanted to go for SLR. Well, obviously to learn photography by learning control over light (Aperture/Exposure/ShutterSpeed). On comparing G5 with my Film SLR, I found that almost all the controls were included in G5 for which I wanted to buy an SLR.

This new category is called Prosumer Cameras. Basically it is top end Non-SLR cameras.

I had decided for Canon earlier, and I was already looking at Prosumer cameras. The questions was their prices will come down too ... Why spend more now? After looking at the G5 features, I think
It looked like I will have enough learning for this guy itself. And if I am going on a long vacation, might as well spend money now then later for a good camera.

Then again that Canon G5/Sony V1/Nikon 5400 confusion started. These are all 4x, 5MP cameras. DPReview has "highly recommended" the other two while G5 is only "recommended". So I again had to consider the brands. I simply went to dpreview.com and read all the three detailed reviews one by one. Also read almost all the definitions of what those specs meant.

Here are the main points I considered. There are other differences that were not important to me.

Sony V1

  • Very low noise .. for any ISO setting.
  • Small and sleek compared to the other two
  • The famous Carl Zies lens (but not as wide aperture as Canon .. wider aperture = more light)
  • Worst battery life of the three (almost half of Canon G5).
  • Uses Memory sticks which are relatively expensive.
  • Price lower then G5 by $100. Lighter in weight compared to the others.
  • USB 2.0 connectivity
  • No flip out LCD
  • Fast in media access


Nikon 5400

  • Relatively lower noise at higher ISO compared to G5 but higher then Sony.
  • Better zoom. More steps.
  • Wide angle (28mm) compared to the other too (35mm).
  • Battery life not as good as G5 but better then Sony.
  • lens specs about same as Sony. Battery life also between Canon and Sony.
  • Best performance in chromatic scenes, i.e. pictures where there are bright sharp lights or a lot of stainless steel like stuff.
  • USB 1.1 connectivity.
  • Flipout LCD


Canon G5

  • Again, best color reproduction.
  • Finest details in picture.
  • Best battery life, way ahead of the other too.
  • Very wide aperture lens (F2.0 at wide angle).
  • High noise at higher ISOs, High purple fringing at wider aperture.
  • Heavy and bulky compared to other two..
  • Oh and of course the wireless remote control for playback or timer shot shutter release.
  • USB 1.1 connectivity.
  • Flipout LCD.
  • You can see lens barrel in viewfinder !(I couldn't believe it at first!)


As you can see there was a no perfect camera here. And in any direction, there were compromises to make. So again I got back to what is important to me. Color reproduction, Fine details. But then,
I end up with a bulky camera. Also the concern about noise at higher ISOs.


Here is what I finally filtered out for me.

Sony V1
Reasons to buy : Very slick, very compact, very low noise.
Reasons Not to buy : Very low battery life, media is relatively expensive, No flipout LCD

Nikon 5400
Reasons to buy : best overall balance of all the features, wider angle
Reasons not to buy : low battery life, slowest in media access

Canon G5
Reasons to Buy : best colors and details, really good battery life
Reasons not to buy : purple fringing, noise, can see lens barrel in viewfinder


(As you can see, I did not pay much importance to the preset modes etc. There are other things too that were not important to me.)

Here are the counter points.


  • Well, I had to drop the compactness criteria in favor of colors, which is what the camera is for. It was not a consumer camera anyway, it was the next category where I guess being bigger is normal. Sony is always great at miniaturization, but that is not the norm. Also I read some people complaining about small size not being good for grip (5MP magnifies your shakes also ... got to be even more stable).

  • Regarding noise, well, I am not going to take all my pics at higher ISOs. For those late night pics, you can always decrease the shutter aperture. Also, on further reading I realized that there are ways
    around it using photoshop etc if you really really want to do it and have time.

  • Next issue was the purple fringing. You will see purple area around very bright lights. The workaround is reduce the aperture and decrease the shutter speed. The only time this will not work is if you want to take a picture of a fast moving object at low lights no flash... well, how often do we do that anyways.. in those cases, you have to live with some purple fringing. It will bother purists more then anyone else, so I think I am OK with that as an amateur.

  • Last one, the lens barrel, I thought I'll have to use viewfinder to take picture only when running very low on battery. But again Canon has the best battery life of all.


So, finally I decided for G5 :-). I don't think I'll buy an SLR in near future.

Labels:

<< Latest

New Blogger

Hmm... so being a new blogger, I was wondering what should I start blogging about. Well, I'v been using a new Digital Camera - Canon G5 - for over 7 months now and have been taking a lot of pictures. So thought may be that would be fun to write about! So here we go ... !